Friday, July 18, 2014

Orange Poppies

Orange is one of those colors...love it or hate it. As for me, I think orange is a HOT color for summer!


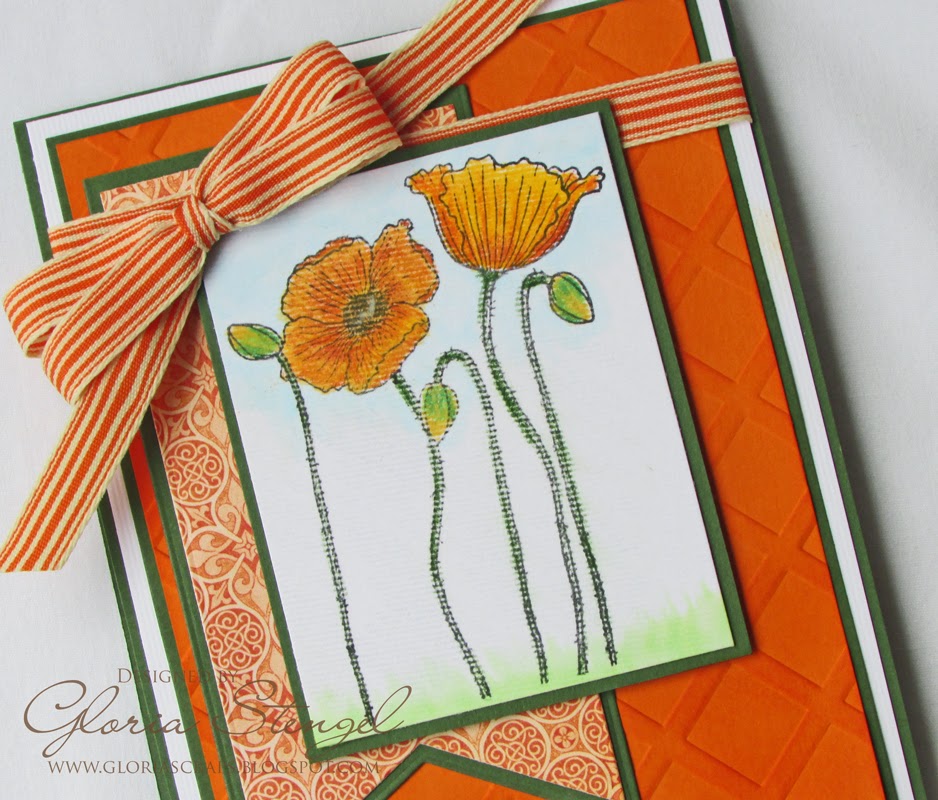
I used orange, dark green, and white for this bright and cheerful card. To make your own:

1. Create a 5 1/2 x 4 1/4 inch, top-fold card from Original ColorMates Cardstock Deep Spring Green. Set aside.

2. Trim a 5 3/8 x 4 1/8 inch panel from ColorMates Textured Twill Cardstock White.

3. Trim a 5 1/8 x 3 7/8 piece of Deep Spring Green cardstock and attach it to the center of the white twill cardsotck.

4. Trim a 5 x 3 3/4 inch piece of Original ColorMates Cardstock Deep Orange Dream. Emboss the panel with a Lattice Embossing Folder (Crafter's Companion). Rub the raised embossing with orange ink (Ranger Distress Dried Marigold).

5. Attach the orange panel to the center of the green panel. Wrap all layers with orange striped grosgrain ribbon (Really Reasonable Ribbon). Attach the panel stack to the card front.

6. Trim a flag banner shape from Deep Spring Green cardstock and attach it to the left edge of the card as shown.

7. Trim a smaller flag banner from orange decorative paper (Graphic 45 Eerie Tale) and attach it to the green banner.


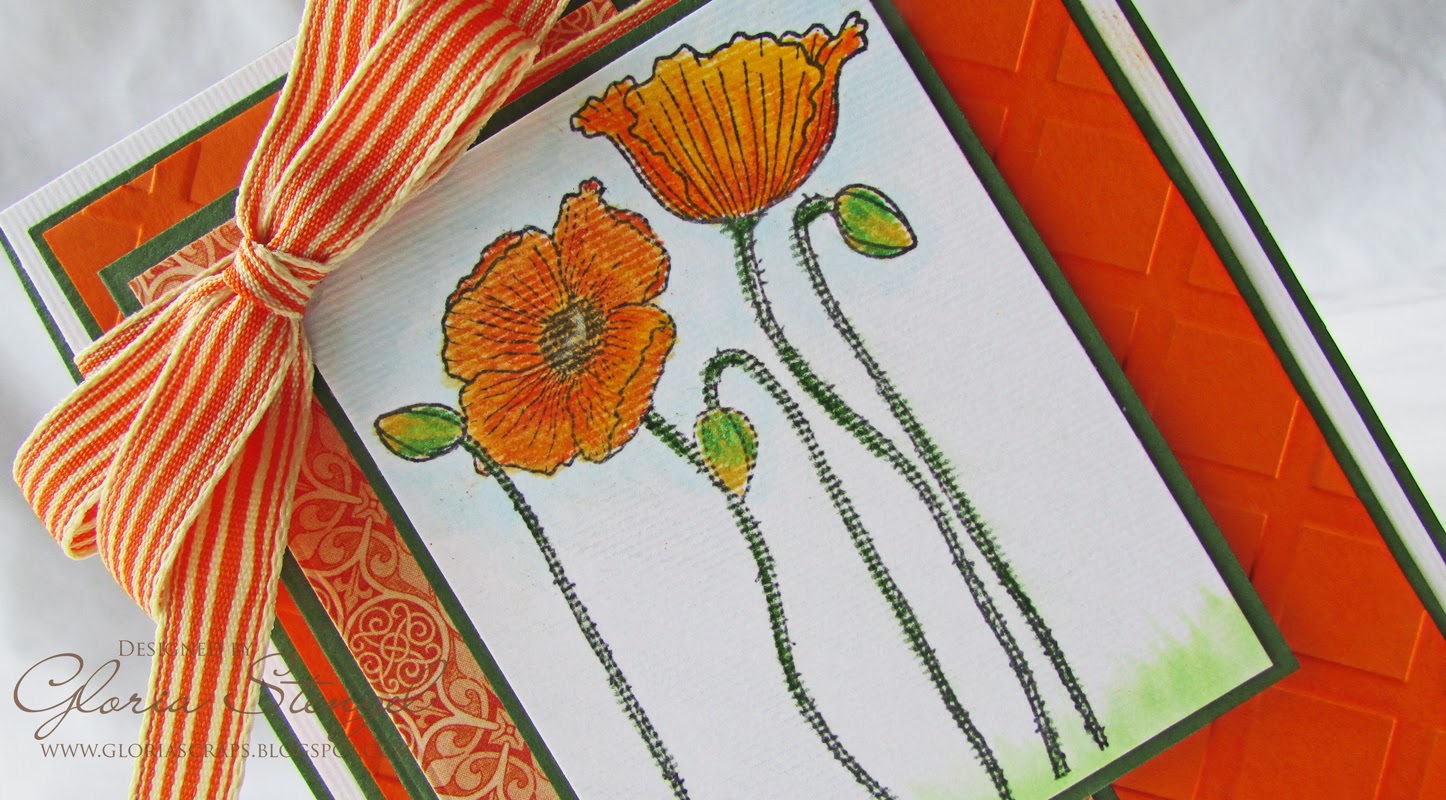
8. Stamp the poppies image (Sweet 'n Sassy Stamps) onto  ColorMates Textured Twill White with black dye ink.

9. Color the image with colored pencils (Prismacolor) and alcohol markers (Copic). Trim to size and mat with Deep Spring Green cardstock. Attach the image to the card front with foam dots. 

10. Tie a "fancy" bow at the upper left edge of the image. 


11. Decorate the inside of the card. Trim 5 3/8 x 4 1/8 inch panel from ColorMates Textured Twill White cardstock and attach it to the inside of the card. 

12. Use a small square punch to punch seven squares of decorative paper in orange and green. Attach the squares in a diamond pattern at the bottom of the white panel.

13. Stamp a sentiment with black ink onto the white twill cardstock. Trim the sentiment with a circle die template (Spellbinders). Mat with a Deep Spring Green cardstock circle. Attach the circles to the top, center of the inside panel with foam dots.


Thanks for joining me today! I hope you will give the ColorMates Textured Twill cardstock a try! I love how it makes my image look as if it were stamped onto canvas...and water colored!

~ Gloria (Scraps of Life)

Supplies Used:
WorldWin Papers:
Original ColorMates Cardstock Deep Spring Green, Deep Orange Dream
ColorMates Textured Twill White

Embossing Folder: Crafter's Companion Lattice
Ink: Memento Tuxedo Black; Ranger Distress Dried Marigold
Colored Pencils: Prismacolor
Markers: Copic
Dies: Spellbinders Standard Circles Large, Small; My Favorite Things Banner Flag Stax
Punch: Carl
Stamps: Sweet 'n Sassy Stamps Precious Poppies
Ribbon: Really Reasonable Ribbon Orange Striped Grosgrain
Adhesive: Scotch 3M ATG tape; Scrapbook Adhesives by 3L 3D Foam Squares; Glue Dots

Thursday, July 17, 2014

Bedtime Story with G45


Well, this post was scheduled to go live YESTERDAY, but for some reason did not, and reverted to draft, so it's a day late! Sorry about that. Today I wanted to share a mini-album that I made for our sweet Granddaughter! I used Graphic45's Mother Goose collection. I started with Worldwin Heavy chipboard for the base. I cut 6x6 pages for this one.  I then covered each base piece with cardstock. I used yellow, blue and red to match the patterned paper.


After covering the chipboard pages with the cardstock I then cut smaller pieces of the Mother Goose paper a little smaller and attached them to each base page.


Then I decorated each page with all of the wonderful chippies and die-cuts that come with this adorable collection. I only added a few miscellaneous buttons and ribbon and that was it!


 This was really a fun little album to put together, it was so easy with the ColorMates cardstock and all of the great embellishments with this G45 collection. You can always find a color to match your project with all of the colors offered in the WorldWin collections, either the Smooth & Silky, the Original ColorMates, DoubleMates or Treasures!!!!


Thanks so much for visiting the blog today, and I hope you enjoyed the mini-album. Please check back for new projects created by the design team!!!

WorldWin Products used:
WorldWin Heavy Chipboard
WorldWin ColorMates 

Graphic45 Products used:
Mother Goose Collection
4500756 12x12 Collection Pad
4500758 Flowers
4500757 Banners
4500759 Tags & Pockets
4500760 Stickers
4500761 Alphabet Stickers
4500762 Chipboard diecuts
4500763 Chipboard diecuts

Other Supplies used:
Plus Brand adhesives
ribbons
buttons

Thank you!!!  Patti

Monday, July 14, 2014

Faux Canvas with Textured Cardstock

Today's project is a faux canvas - and I'm going to show you how I created it.  I've found that sometimes if you add much media to a scrapbook layout, the page warps or curls - so this simple trick not only gives you more of a canvas look, it also solves this pesky problem.


1.  Begin with a textured cardstock (WorldWin ColorMates Textured Denim - Aqua Denim).  Use a household sponge to brush on a thin layer of gesso.


2.  Run a piece of 12 x 12 chipboard (WorldWin Heavy Chipboard) through the Xyron Creatopia to apply an edge to edge layer of adhesive.


3.  Carefully line up the edges, and  lay the cardstock  down on the chipboard.

4.  Stamp background images (Creative Embellishments) using watermark ink, and heat emboss with white powder.


5.  Arrange the elements of the layout as desired, using the Xyron/Teresa Collins foam adhesives when dimension is needed.

6. Use the Xyron Double Sided Tape to adhere the ribbon elements.

7.  Cut 3 chevrons from the printed paper ( Simple Stories - Hello Baby) Score the center of each.


8.  Use a scrap piece of plastic cross stitch canvas as a guide to pierce evenly spaced holes for stitching.
9.  Use twine to handstitch the chevrons.  Cut a plain cardstock chevron, and apply adhesive using the Xyron 5" Creative Station.  Place this on the backside of the chevrons, for a place for hidden journaling.
10.  Use double sided tape, down the spine of the chevrons to add to the layout.

11.  Fussy cut the title from the patterned paper, ink the edges and use foam adhesives to apply.

12.  Paint over the May Arts Sequin Heart with gesso to tone down the color and add to the center border.
I hope you have enjoyed my project - and remember to check out the rest of the inspiration this week!

Supplies:
 WorldWin Papers
Xyron:
May Arts Ribbon
Simple Stories
Zva Creative
CR-05CA-133
Creative Embellishments

Monday, June 30, 2014

Wishing You Everything Happy


Hi, it's Gini and today I have a card to share with you that really shows off our ColorMates Smooth and Silky line.  This paper is just as it's name implies , and it is the perfect choice for so many paper crafting techniques. On my card today, I've shown you how beautifully it works for die cuts, embossing, stamping and flower making. This is truly a go-to cardstock.


So here is how I created my card.

1. Cut a card base 5" x 7" using the Natural cardstock.
2.   Cut a piece of the Beach cardstock 1/4" smaller and emboss using the M-Bossabilities folder.  Ink over the raised areas with Desert Sand ink.
3.  Cut a piece of cardstock in Sage 1 1/2" x 4 3/4".  Adhere satin ribbon to the middle.
3.  Line the edges of the last piece using the pearl strips.
4.  Die cut a border using the Moroccan Accents and adhere to the back of the ribboned panel. Adhere to the card.
5.  Stamp the decorative label using watermark ink and heat emboss with clear powder. Cut out the label.
6.  Stamp the sentiment with Chocolate ink. Use foam adhesives to apply to the card as shown.
7.  Die cut flowers, mist with Sandcastle Colorations and shape by pleating while damp.  Assemble the flower, add a large pearl for the center.
8.  Cut strips of ribbon with fish tail ends, and glue to the back of the flower.  Adhere the flower to the card.
9.  Cut the decorative flourishes and tuck behind the flower.
10. Finish with a corner pearl flourish.


Supplies
Zva Creative:
Flourish PE-02CB-132
Pearl Lines PE-02CB-107
Large Pearls CRW-05CA-176
JustRite Stamps - Birthday Vintage Labels Four
May Arts Ribbon - HA-78-02
Spellbinders Dies - Moroccan Accents; Arianna Lace, Arianna Blooms
Art Anthology Colorations - Sandcastle
Spellbinders M-Boassabilites - Decorative Fancy Tags Two


Let's Get Trendy!

Hello, it's Gloria with you today! One of the big trends in card making right now is Clean and Simple cards. I am not much of a CAS card maker, preferring lots of paper and many layers, but I wanted to give the style a go! I also wanted to use some of my NEW sequins, as they are very trendy right now, too.


I made a top-fold card from WorldWin ColorMates Smooth and Silky Gold cardstock. I embossed a piece of Smooth and Silky Fresh Cream cardstock with a splatter embossing folder. I then rubbed some ink over the raised areas. (I guess that's three layers so far...or four...)


I used black dye ink to stamp "birthday" at the bottom edge of the embossed panel. Then, I cut "happy" from Smooth and Silky Black cardstock and attached the die cut shape to the card. I had to trim the left edge of the shape as it is 7 inches long and the card is only 4 1/4 inches. I added some sequins for that extra trendy look.


I added some "splash" to the inside of the card as well. Thanks for looking!

~ Gloria (Scraps of Life)

Supplies Used:
WorldWin Papers:
ColorMates Smooth and Silky Fresh Cream, Gold, Black

Embossing Folder: Sizzix Tim Holtz Alterations Ink Spots
Ink: Memento Tuxedo Black; Ranger Distress Dried Marigold
Die: Papertrey Ink One Liners Happy
Stamps: My Favorite Things Birthday Sentiments, Clearly Sentimental About Birthdays
Sequins: Craft Medley Black and White Classic; Studio Calico Atlantic
Adhesive: Scotch 3M ATG tape; Aleene's Fast Grab Tacky Glue

Thursday, June 19, 2014

WorldWin Papers is Sponsoring Craft Hoarders Anonymous!

Remember, Cardstock Lovers! WorldWin is sponsoring the Craft Hoarders Anonymous Challenge Blog this month! WorldWin is teaming up with StencilGirl to give away an amazing prize!


You have until June 29th at midnight PT to enter the challenge for a chance to win this prize! Plus, the Craft Hoarders Anonymous team is having a week-long blog hop with the StencilGirl team! Click HERE to enter!

Here is a peek at my project!


For full details and a tutorial, click HERE.

I used these fabbie WorldWin products on my project!

ColorMates Smooth and Silky White, Black
Tube Black
Crafty Board Heavy Weight chipboard

~ Gloria Stengel (Scraps of Life)

Friday, June 13, 2014

Happy Father's Day from WorldWin!

Hello! I have made a card for all the dads out there! I hope you all have an amazing Father's Day on Sunday!


I was able to get my hands on the ColorMates Smooth and Silky Assortment Packs! Yes, that is 75 sheets of yummy colors! I used White and Bark from the Neutral/Earth Tone assortment, Apple Red from the Warm assortment, and Military Green from the Cool assortment for my card. 

Here's how to make a card of your own!


1. Start by creating a 5 x 5 inch card base from Smooth and Silky Bark cardstock. 

2. Trim Apple Red cardstock to 4 7/8 x 4 7/8 inches and emboss with a gear pattern embossing folder. 

3. Rub gray ink over the top of the embossed areas.  

4. Wrap a torn strip of natural-colored linen around the top of the red cardstock and tie a knot on the right side. 

5. Attach the embossed cardstock to the card front.

6. Trim a banner, approximately 4 3/4 x 2 1/8 inches, from Military Green cardstock.

7. Trim a second banner, slightly smaller, from striped paper. Glue the banners together and attach them to the left side of the card, placing the banner over the strip of linen. 

8. Trim a banner, approximately 4 5/8 x 2 1/8 inches, from Bark cardstock.

9. Trim a second banner, slightly smaller, from text paper. Glue the banners together and attach them to the card just to the left of the linen knot, overlapping the first banner.


10. Place some double-sided tape onto the text banner, approximately 3-inches from the top of the card. Place natural and red twine, in a circular pattern, over the tape.

11. Stamp an image onto White cardstock and color as desired. Trim the image, edge with tan ink, and mat with Military Green cardstock.

12. Using foam tape, place the image over the twine as shown.


13. To decorate the inside of the card, trim two pieces of White cardstock to 4 7/8 x 4 7/8 inches. Edge with tan ink.


14. Place one piece of White cardstocok onto the top of the inside of the card.

15. Create a gift card pocket by trimming Apple Red cardstock with a gift card pocket die template. Emboss the pocket with a gear pattern embossing folder. 

16. Rub gray ink over the top of the embossed areas.  

17. Trim a piece of text paper to line the inside of the gift card pocket. Assemble the pocket.

18. Wrap the pocket with twine and attach it to the center of the card panel.


 19. On the second piece of White cardstocok, stamp a sentiment and a coordinating image with brown ink as shown.

20. Place the stamped cardstock onto the bottom of the inside of the card.


21. Fill the gift card pocket and give the card to the guy in your life!

For more inspiration, visit my blog: Scraps of Life.

~ Gloria

Supplies Used:

WorldWin Papers products:
ColorMates Smooth and Silky 8 1/2 x 11 inches, 80# Cardstock Assortment:
White
Bark
Apple Red
Military Green

Other products:
Designer paper: Authentique Flourish Foundation Two; Graphic 45 Good Ol' Sport Victory
Die cut templates: My Favorite Things gift card pocket, Fishtail Flags
Stamps: Stampin' Up Countryside (truck - the other stamps are various retired Stampin' Up)
Ink: Memento Rich Cocoa, Tuxedo Black; Close to My Heart Grey Flannel; Ranger Distress Old Paper
Embossing folder: Cuttlebug Clockworks
Markers: Copic
Linen: leftover cross stitch fabric
Twine: May Arts
Adhesive: Scotch 3M ATG tape; Scrapbook Adhesives by 3L 3D Foam Squares; Scor-tape